
Locking the keyboard when stepping away from your workstation is a good security measure, both at home and at work. From preventing accidental typing to closing programs before you’re ready, there are a variety of reasons to disable your keyboard. With multiple ways to do it, you’re able to pick the one that’s right easiest for you.
Tip: Learn how you can add a new Language keyboard in Windows.
1. Use Device Manager to Disable the Keyboard in Windows
Most of the methods discussed below involve the use of third-party utilities to lock the keyboard. However, if you don’t want to use a third-party application, there is still an option to lock the keyboard through the device manager.
Note: This is only a temporary solution. Every time you restart your PC, Windows will reinstall the keyboard.
- Right-click on the Start button to invoke the power user menu or press Win + X. Once it opens, scroll down and click the “Device Manager” option.

- The system will display a long list of all the connected devices. Scroll down and expand “Keyboards” to see the connected keyboards.
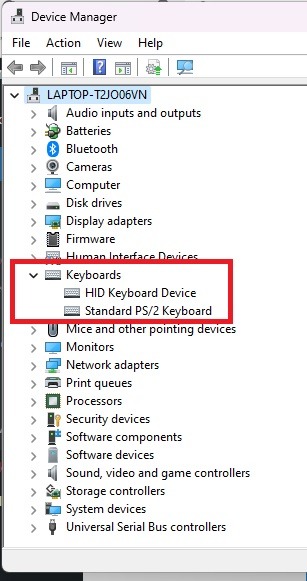
- Right-click the keyboard you want to disable and choose “Uninstall device.” If you’ve connected more than one keyboard, you’ll need to disable them one at a time.
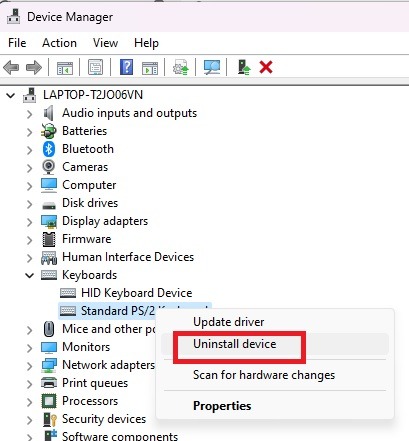
- Click the “Uninstall” button. If prompted to restart your PC, click “Yes,” and that device will be disabled once the system comes back online.
Fixes: Having difficulty opening the Device Manager? Here are several other ways to open Device Manager in Windows.
2. Permanently Disable Laptop Keyboard
As stated above, uninstalling the device only works temporarily. If you have a laptop keyboard and prefer using an external keyboard, you can permanently disable the keyboard in Windows. With that disabled, all you have to do is turn off your external keyboard using its built-in switch to disable it temporarily.
- Use Method 1 to uninstall your keyboard. Make sure you’re uninstalling the built-in keyboard and not your external one. Obviously, you’ll need an external keyboard already connected to continue the rest of these steps.
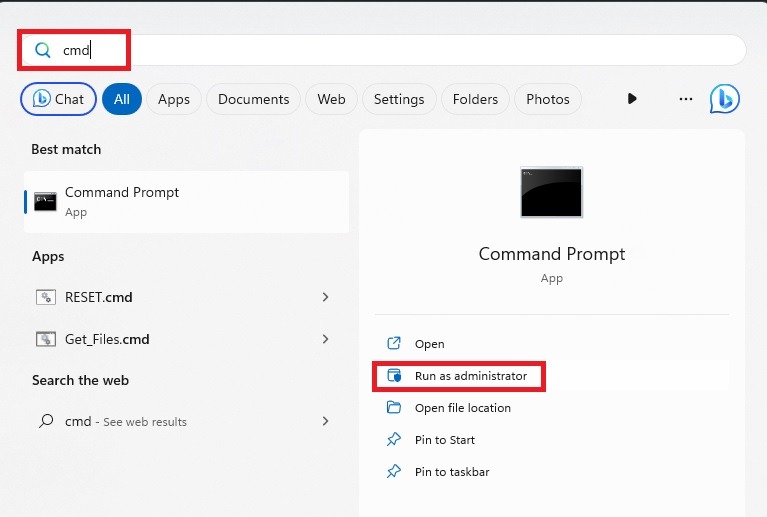
- Open your Start menu and type cmd.
- Select “Run as administrator” under Command Prompt. You’ll need an administrator account to do this.
- Click “Yes” if prompted by the UAC.
- Enter the following command to disable the port your laptop’s keyboard needs to run:
sc config i8042prt start= disabled
If your port number is different than what’s listed in this command, use that port number instead. For most, this is the right port number.

- You’ll see a success message. Close the Command Prompt window and restart your computer.
- When your PC restarts, your laptop keyboard shouldn’t work any more.
If you decide to use your laptop’s keyboard again, re-enable it by using the following Command Prompt command:
sc config i8042prt start= auto
3. Use KeyFreeze
Locking your keyboard quickly is critical if you have kids and pets that seem to appear out of nowhere to play on your keyboard. The previous methods aren’t always the quickest way to disable your keyboard in Windows.
With KeyFreeze, you press a button and your keyboard and mouse freeze in just five seconds.
- Download KeyFreeze. It’s completely free and it’s a tiny application.
- Double-click the downloaded to file to install KeyFreeze. If you get a warning about installing apps from third-party sources, confirm you want to proceed.
- You’ll see a small window appear with a single button. Press the “Lock keyboard and mouse” button to temporarily disable your Windows keyboard.
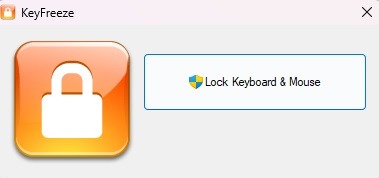
- Pay close attention to the key combination to unlock your keyboard and mouse. Otherwise, you’re stuck unless you shut down your computer using the power key.
- Wait for your devices to lock.
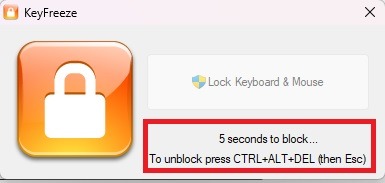
- Try using your keyboard and mouse. Nothing should work. While it should work on older versions of Windows, I can verify that it does work on Windows 10 and 11.
- Press Ctrl + Alt + Del. When the screen goes black and shows more options, press the Esc key. This unlocks your keyboard and mouse.
To make it easier to access KeyFreeze quickly, I’d recommend pinning it to your taskbar. Then, it’s available in a single click versus going to your Start menu.
Note: If the app icon does not show up in the Taskbar, use the fixes here to get the missing icons to show up in the Taskbar.
4. Use LiteLockr
LiteLockr is a free open source app that’s similar to KeyFreeze, but has an added benefit. A simple key combination is all it takes to lock your keyboard and mouse. What’s nice is you’re able to choose whether you want to lock both your keyboard and mouse or just one or the other.
As a warning, the keyboard shortcut to unlock your keyboard and mouse doesn’t appear when locking things via the interface itself. You can use the same Ctrl + Alt + Del and then Esc combination as KeyFreeze, or use whatever keyboard shortcut you decide to setup.
- Download and install LiteLockr.
- When you install it, you won’t see an icon on your desktop or in your Start menu. Instead, it automatically starts running and only shows up in your notification tray as a tiny lock.
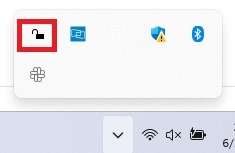
- Click the lock icon to open LiteLockr.
- Click the lock to instantly lock your keyboard and mouse. Or, click the small menu in the top left corner to access more settings. I recommend checking out the settings first.

- Click the Settings icon (gear). From here, you can customize your lock/unlock hotkey, specific apps you’d prefer not to lock, set a PIN to prevent accidental unlocks/locks, and more. Check the “Start with Windows” box at the bottom to ensure LiteLockr starts with your PC. To lock your keyboard and mouse immediately, open the “Advanced” tab and set the lock delay to “0” versus “5.”
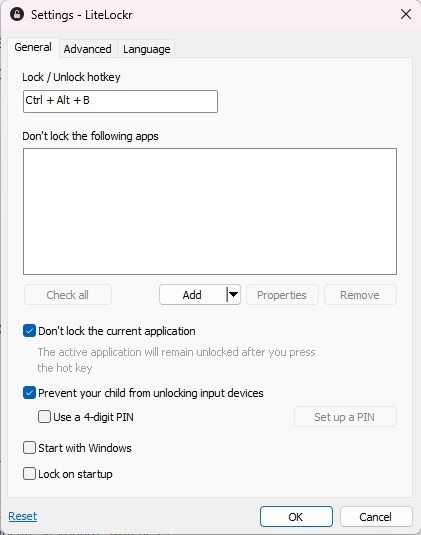
- Press “OK” to save your changes.
- If you only want to lock your keyboard or just your mouse, open LiteLockr from your notification tray. If the menu is still up, tap the menu icon in the top left corner to close it. Click the keyboard and/or mouse icons on either side of the lock icon. If there’s a line through, it’ll lock. If not, it won’t lock.

- Either click the lock icon or use the hotkey shortcut you set in the Settings of the app. While your mouse still moves around, it can’t click on anything. Simple press the same key combination to unlock everything.
Frequently Asked Questions
Why is my keyboard not typing?
If your keyboard is suddenly not responding, it doesn’t mean it’s locked accidentally. Instead, it could be due to a bad Windows update, system file errors, driver issues, and more. Troubleshoot these issues using our laptop keyboard not working guide.
If your keyboard doesn’t respond to any of the troubleshooting tips, it may be time to replace it. Even if your built-in keyboard isn’t working, you can still use an external wired or wireless keyboard. Check out our recommendations for the best RGB keyboards, ergonomic mechanical keyboards, and Logitech keyboards.
How do I know if my keyboard is locked?
You can try using the Ctrl + Alt + Del and then Esc combination to see if maybe there’s an app installed causing your keyboard to lock.
If you’re using certain Dell, HP, and Lenovo models, you may have a keyboard lock button in the function key row. This isn’t available on all models. If you see a function key with a keyboard on it, press Fn plus the applicable function key, which is often F11.
If you have another external keyboard around, connect it to see if it works. If it does, your other keyboard is either locked or just not functioning correctly.
Otherwise, try pressing Ctrl + Alt + Del and clicking the Power icon in the bottom right to turn off your PC. If your keyboard doesn’t respond, hold the power button on your PC until your computer shuts down. Then, power it back on. This should unlock the keyboard. If it’s still not working, it’s most likely a hardware or driver issue.
Can you accidentally lock your keyboard?
Yes, though it’s not easy. If you or an overly helpful child or pet has accidentally enabled stick and filter keys (by holding or repeatedly pressing the Shift key), your keyboard won’t work as expected and may appear locked.
Use your mouse to go to “Settings -> Accessibility (Ease of Use in Windows 10) -> Keyboard.” Toggle “Sticky keys” and “Filter keys” to Off.
Of course, if you’re using an app for locking your keyboard, you may have accidentally pressed the hotkey. Try using the hotkey combo to unlock it.
How can I type temporarily if my keyboard isn't working?
If you need to type and don’t have another keyboard around, you can use your mouse and the on-screen keyboard in Windows. This is ideal if you need to download a driver to try and fix a locked keyboard.
Go to “Settings -> Accessibility (Ease of Use in Windows 10) -> Keyboard.” Turn on “On-screen keyboard.” It’s not as fast as typing on a physical keyboard, but it’s a good temp solution.
Image credit: Unsplash
Our latest tutorials delivered straight to your inbox