While gaming on Windows, it’s not uncommon to run into complications that hinder your experience. For instance, games often stutter due to various issues, and it can be a difficult task to get things running smoothly again. This guide provides you with practical solutions to fix game stuttering on Windows PCs in a jiffy.
Good to know: check out these tips on how to prolong battery life while gaming on a laptop.
Quick Fixes to Get Started
Before proceeding to the issue-specific solutions, we recommend trying these easy fixes first:
- Install the latest Windows updates: updating your Windows system can often fix the issues that are causing game stuttering. We recommend installing any pending updates before trying any of the other methods described in this post.
- Update your graphics drivers: your system’s graphics drivers play an essential role in running games smoothly. If your system is running an outdated or buggy version of GPU drivers, update them to the latest version.
- Reinstall your graphics drivers: a faulty installation of graphics drivers may be what’s causing your games to stutter. We recommend uninstalling graphics drivers completely, then reinstalling the latest (or stable) version manually.
If you followed these suggestions, and the issue persists, continue with the following fixes.
1. Set the Game Graphics Settings Appropriately
If you’re running a game on higher graphics settings than your system can handle, you will inevitably face game stuttering. Before proceeding, check the minimum (and recommended) system requirements to see whether your PC is up to the challenge. At the same time, you should set the right graphics settings for any games with issues to avoid stutters.
- Open the game on which you’re experiencing stuttering.
- Navigate to “Settings -> Video -> Advanced Graphics.” (The options may vary among game titles.)
- Set a graphics preset that’s right for your hardware, or manually set options like “Texture Quality” and more.
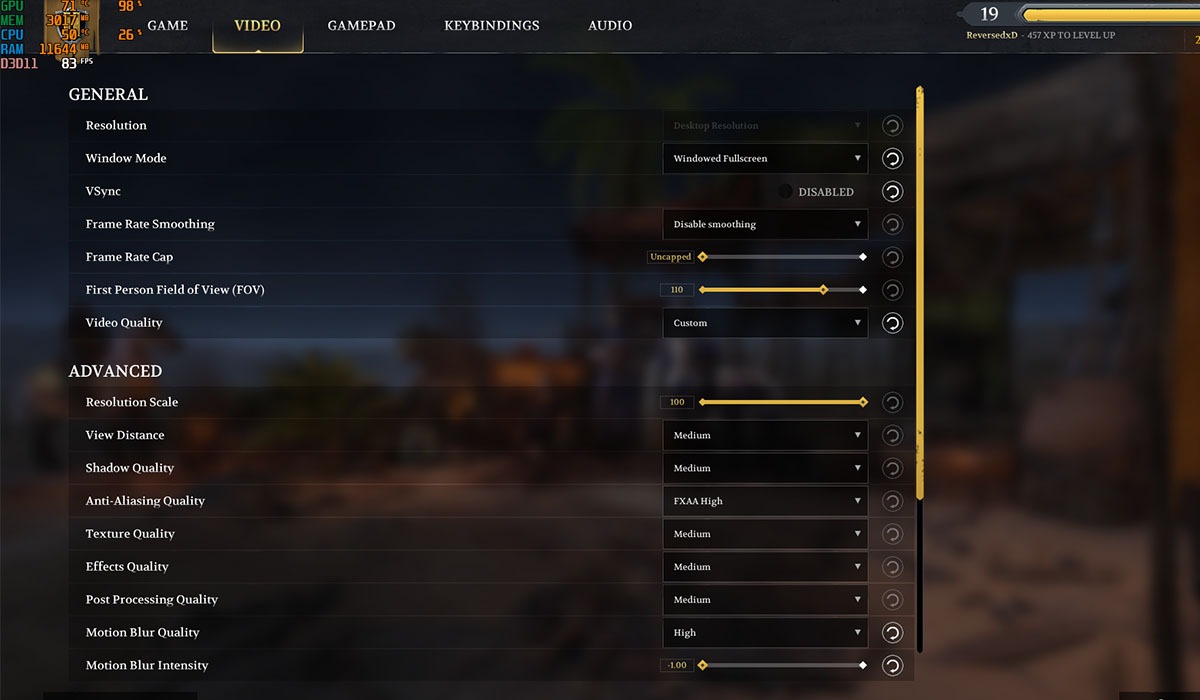
- Also, turn off settings like “Anti-Aliasing” and “Motion Blur” to have a smoother experience on low-end hardware.
Tip: is buying a dedicated gaming laptop really worth it in 2023? Find out the answer.
2. Turn Off the Xbox Game Bar
Windows’s built-in Xbox Game Bar can cause conflicts with various games and ultimately causes stutters, followed by low FPS. Fortunately, you can disable Xbox Game Bar from Windows Settings. To completely be rid of the conflicts due to Game Bar, you will also need to ensure that automatic captures are toggled off.
- Use the Win + I keyboard shortcut to open Windows Settings.
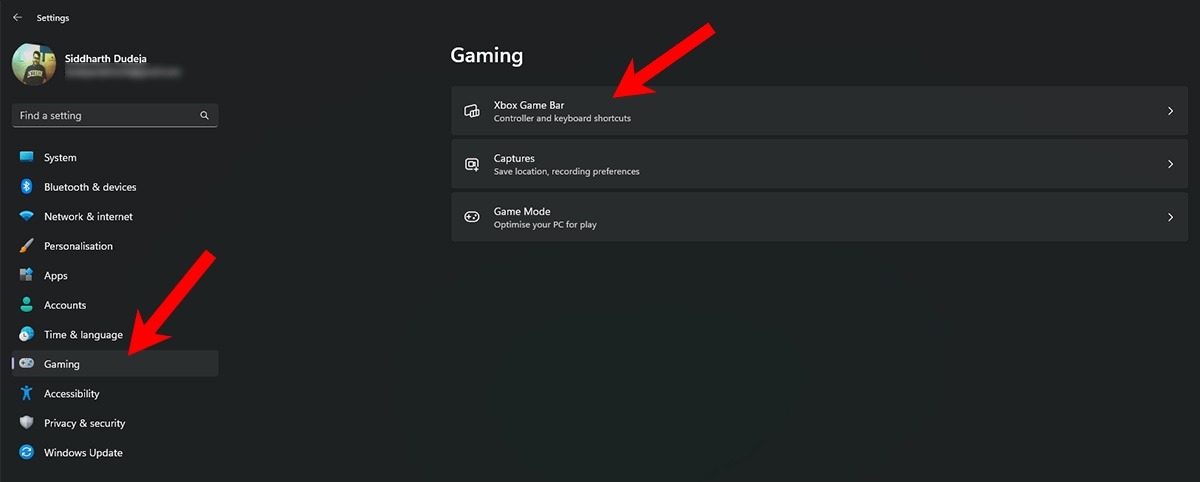
- From the left navigation pane, click on the “Gaming” option, then select “Xbox Game Bar” from the right.
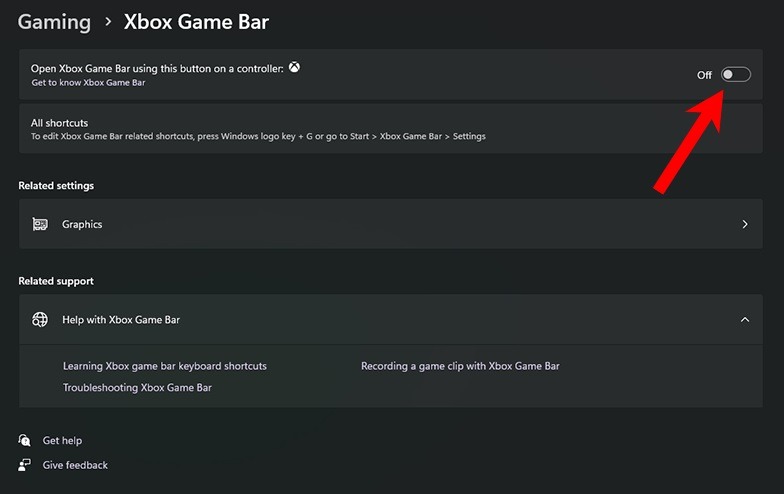
- Further, turn off the “Open Xbox Game Bar” option in the top left.
- Go back to the previous screen (Gaming tab) and select the “Captures” option.
- Disable the “Record what happened” option.
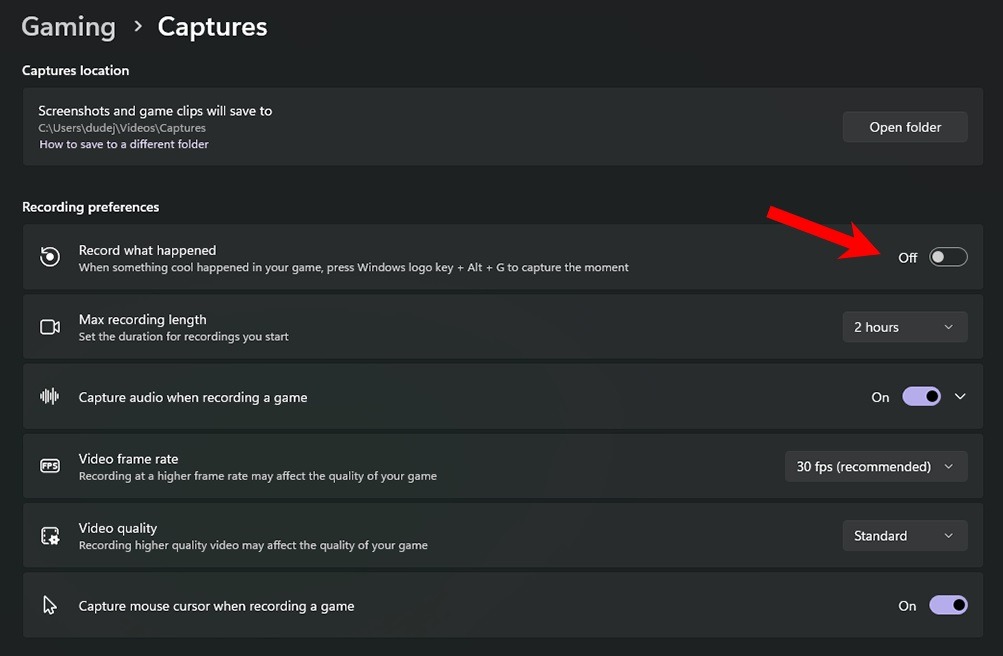
- Restart your computer to check whether the problem goes away.
- If you’re using Windows 10, navigate to “Settings -> Gaming -> Game Bar,” and toggle the “Record clips, screen, and broadcast using Game Bar” option to turn off Xbox Game Bar. Similarly, navigate to “Settings -> Gaming -> Captures,” and toggle the “Record in the background when I’m playing a game” option to turn off automatic captures (or DVR).
3. Enable V-Sync
Vertical Sync, or V-Sync for short, is an option in games that matches the game FPS to your display’s refresh rate so that you can often fix any game stuttering issues you may be facing.
To enable it in-game, navigate to the game’s video settings, and toggle the V-Sync option. At the same time, you can enable V-Sync from your GPU app to have it turned on for all games. These steps demonstrate how to enable the feature using the NVIDIA Control Panel app.
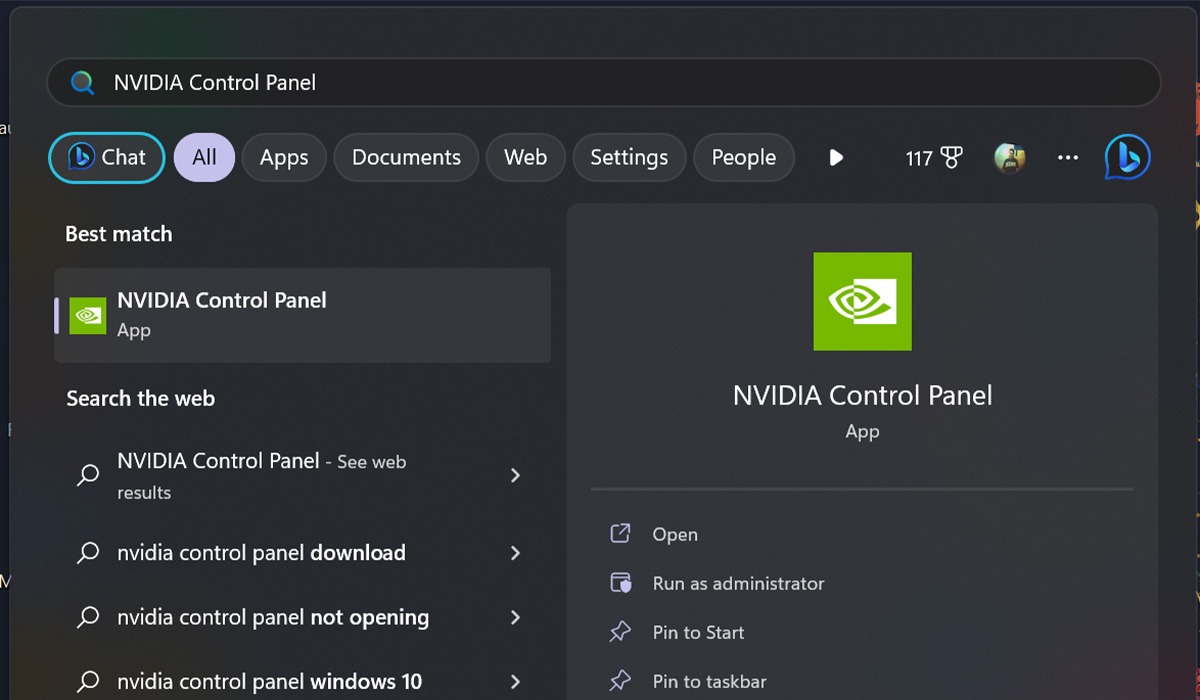
- Open Windows Search, and search for “NVIDIA Control Panel.” Select the best match below.
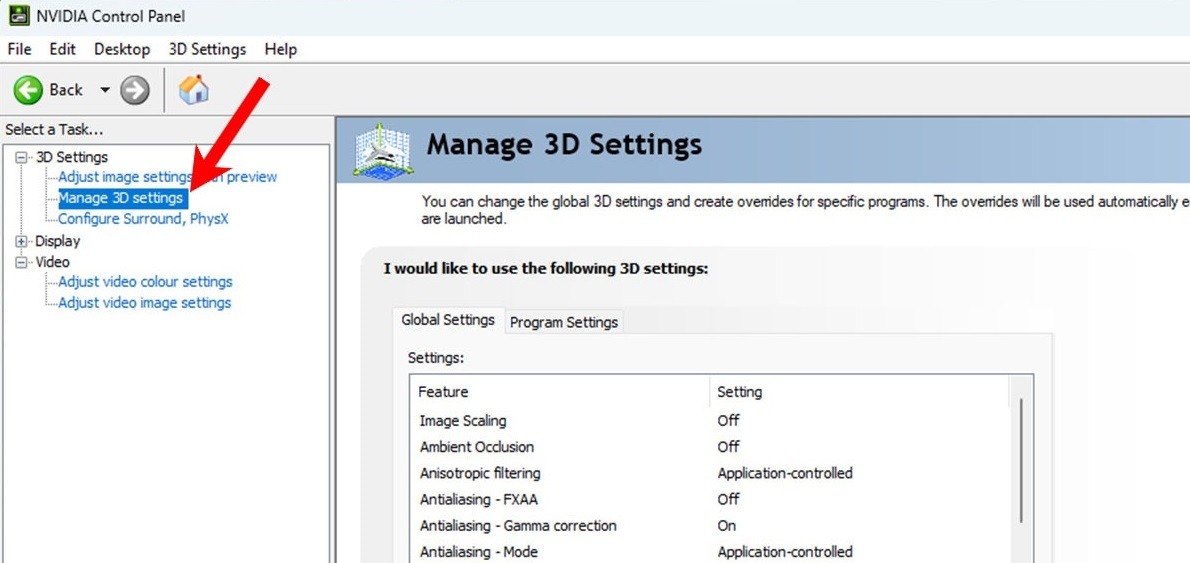
- Click on the “Manage 3D settings” option from the left navigation pane.
- Under “Global Settings” on the right, scroll down through the list of settings, select the “Vertical Sync” option, and click on the drop-down menu to access its options.
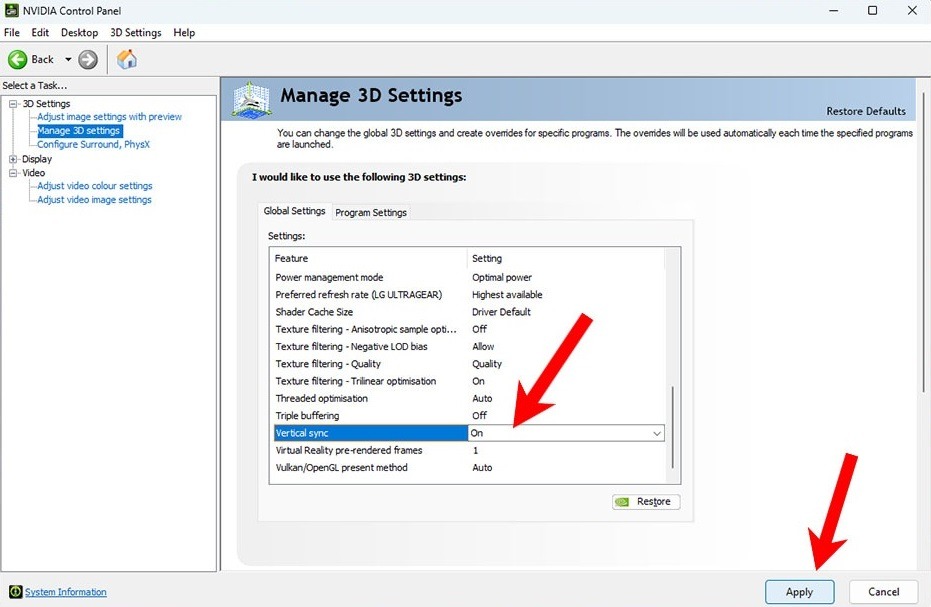
- Select “On” and click the “Apply” button.
- Close NVIDIA Control Panel, launch the game that’s stuttering, and check whether the problem persists.
FYI: want to know more about V-Sync? We outline the advantages and disadvantages of using this feature.
4. Disable Startup Applications
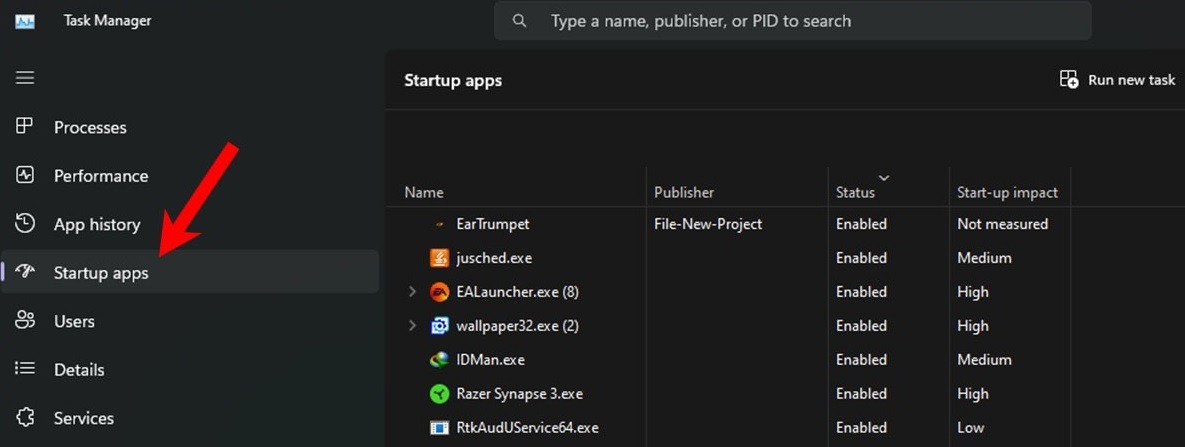
Most Windows PCs have several startup applications enabled that automatically launch every time you’re booting your computer. We recommend disabling the automatic startup for applications that don’t always need to be running to improve gaming performance.
- Press the Ctrl + Shift + Esc keys to launch the Task Manager.
- From the left navigation pane, select the “Startup apps” option. If you’re running Windows 10, select the “Startup” option from the top navigation bar.
- Select the app that you want to prevent from starting automatically, and click the “Disable” button.
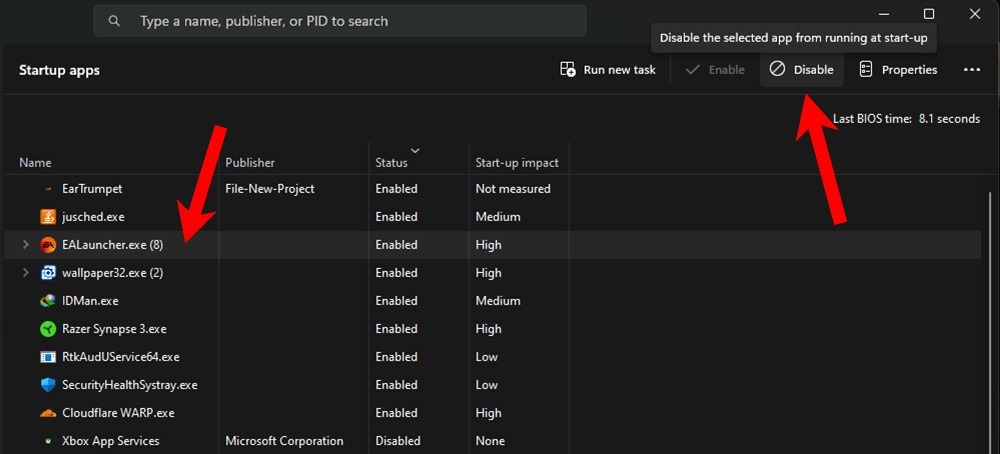
- Repeat the previous step to disable all unimportant apps.
- Close Task Manager, and restart your PC to check whether anything has changed.
5. Reinstall Windows
The quality of a Windows installation has a significant impact on the overall system performance, including games. A bad install will negatively affect all apps and may cause game stuttering on top of poor system performance and occasional slowdowns. Likewise, if your PC often runs into errors or has sluggish performance, you should consider a fresh installation to keep your PC in an optimal state for the best experience.
Use Microsoft’s Media Creation tool or create a bootable USB drive to reinstall Windows on your system.
Tip: if your Windows machine is facing slowdowns and low performance, you may want to consider cleaning up and freeing up your Windows “C” drive.
Fixing Game Stuttering on Windows
It’s often difficult to pinpoint the root cause of game stuttering issues on Windows PCs. However, trying the fixes we discussed in this guide should help you overcome this problem so that you can enjoy an overall smooth gaming experience. To avoid such issues in the future, we recommend keeping your PC up to date, only keeping the applications that you need, and running scans for optimal performance. Likewise, you may want to learn to optimize your Windows PC for gaming to get the best possible gaming performance if you play many games on it.
Image credit: Pexels. All screenshots by Siddharth Dudeja.
Our latest tutorials delivered straight to your inbox