We’ve all been there. You turn on your PC, and instead of getting straight to work, you’re faced with horrific slowdown and loud-running fans. Hit Ctrl + Shift + Escape, and you will see that your CPU usage is inexplicably at 100%.
It’s a common problem that’s, luckily, not usually too hard to solve. Here are several fixes for the 100% CPU usage problem in Windows.
Content
- Reasons for High CPU Usage in Windows
- Basic Fixes
- Disable SysMain (formerly known as Superfetch)
- Restart the WMI Provider Host
- Check Your Power Supply
- 100% CPU Usage in Games
- Disable Third-Party Antivirus Software
- Disable Automatic Startup Applications
- Defragment your Hard Drive
- Disable Cortana
- Turn Windows Notification Settings Off
- Frequently Asked Questions
Reasons for High CPU Usage in Windows
There are many factors that can cause 100% CPU usage in Windows. You should try to find out the cause first before attempting to fix it.
Here are some of the reasons why your CPU gets overloaded:
- Background Processes: Processes that are constantly running in the background can cause many problems. You should monitor hidden processes that are constantly running.
- WMI Provider Host: The WMI Provider Host process is an essential part of the Windows operating system that helps organize, monitor, and troubleshoot different aspects of your computer. Sometimes it could malfunction and lead to various complications.
- Malware Infection: malware infection is often the main cause of 100% CPU usage. At worst, it can cause your computer to break down and cannot run properly.
Basic Fixes
Try these basic fixes first to see if it fixes the high CPU usage issue:
- Restart your Windows: The first solution, in order, is the simplest and often the most effective one. Restarting the computer can clear out temporary files and resolve the slowdown due to long-running processes.
- Update your Drivers: Suboptimal and old drivers can drag down your system. Updating your drivers may eliminate the bugs that might have existed. Search “Windows update” in your search bar and select it. In the opened window, click “Check for updates.” You’ll find out if any new updates are available.
- Scan for Viruses: Malware and viruses can clog your system and cause it to run hot by putting a heavy duty on your CPU and impacting your system’s overall performance. Using your system’s Windows Defender or a reliable third-party anti-malware software, search your system for any malware or corrupted files that may have found their way into it.
If the basic fixes above didn’t do the trick, dig a little deeper with the more advanced approaches below.
Disable SysMain (formerly known as Superfetch)
SysMain is a process by which Windows learns which apps you use most often, then pre-fetches them for you so they load quicker each time you use them. It’s a constant background process that rarely causes problems but doesn’t always play nice with older devices. That used to be known as Superfetch in older versions of Windows.
Here’s how to disable SysMain:
- Right-click your “Start menu” and select “Task Manager.”

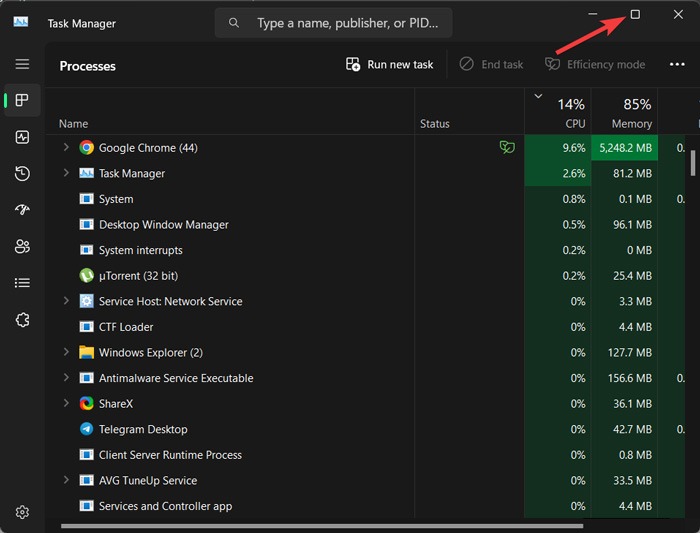
- Click “More details” to expand the window.
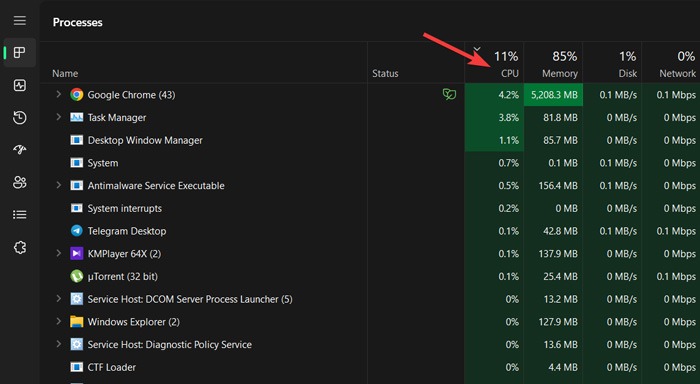
- Select “CPU” to order processes by how much CPU they use.
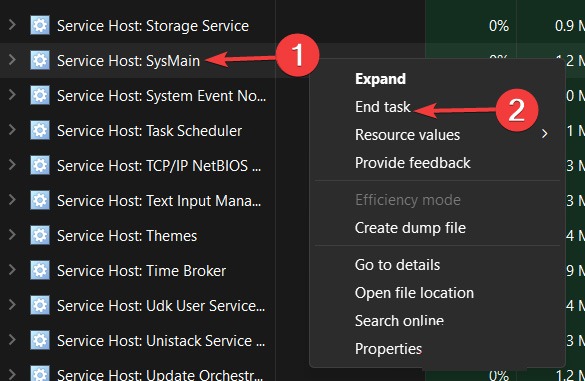
- Right-click “Service Host: SysMain,” and choose “End process.”
Alternatively, here’s how to turn it off permanently:
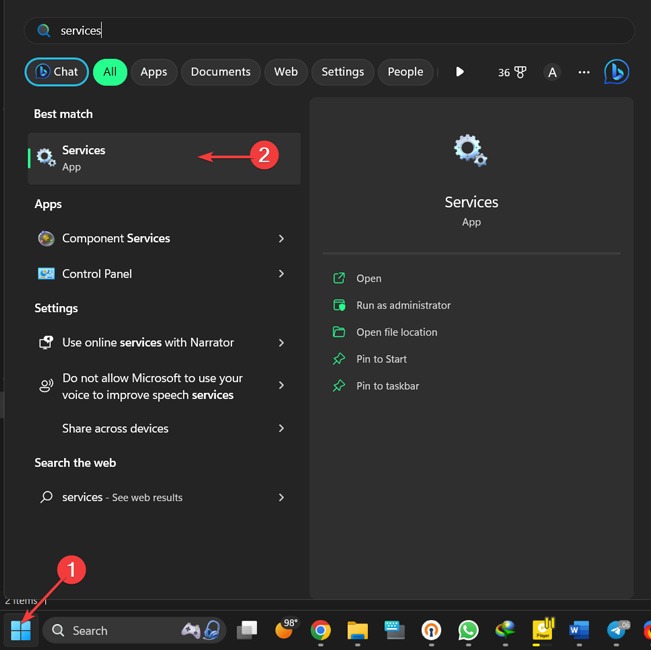
- Click on the “Start menu,” type “Services,” and press Enter.
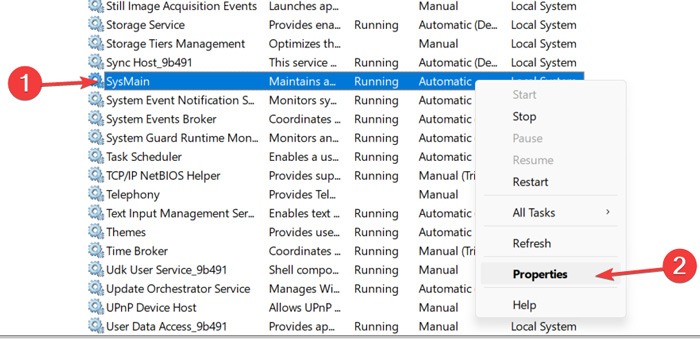
- Right-click “SysMain,” and select “Properties.”
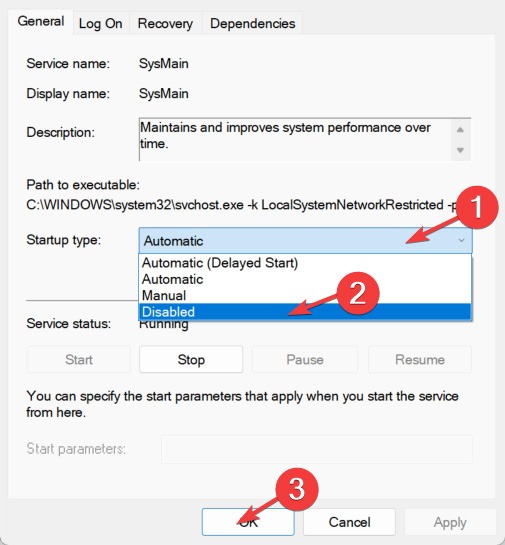
- Open the drop-down next to “Startup type,” choose “Disabled,” and select “OK.”
You can technically do this to any service that’s hogging the CPU. However, some services are system-critical, so you need to be careful. Another culprit of high CPU usage is “Windows Search,” which you can safely turn off.
Restart the WMI Provider Host
The WMI (Windows Management Instrumentation) Provider Host is a core service on Windows that links up with various software on your PC to send information about your operating system. In other words, it’s a critical process, and you shouldn’t disable it lightly. If you see in the Task Manager Processes tab that it’s using a lot of CPU, you should do something about it.
Here’s how to restart the WMI Provider Host:
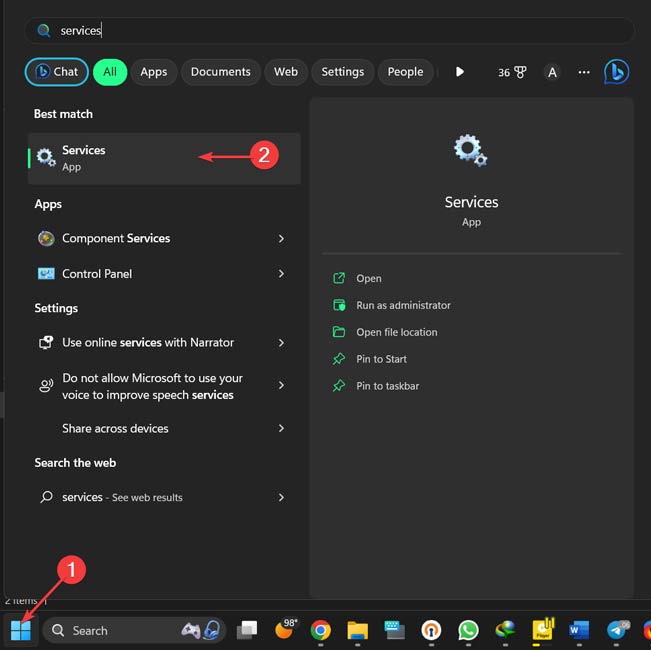
- Click on the “Start menu,” type “Services,” and press Enter.
- Right-click “Windows Management Instrumentation” and select “Restart.”
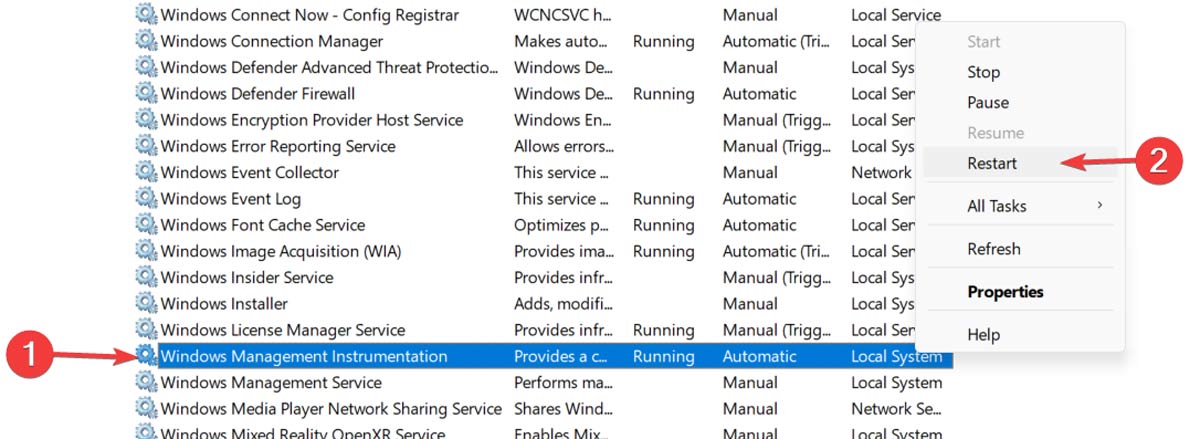
If that doesn’t work, then the next solution is more intricate but also has the potential to offer more long-term benefits for your CPU.
If your 100% CPU usage is due to the WMI Provider Host process in Task Manager, you can identify its source by following these steps:
- Right-click your “Start menu” and open “Event Viewer.”

- Expand “Applications and Services Logs,” open the “Microsoft” folder, then click “Windows.”
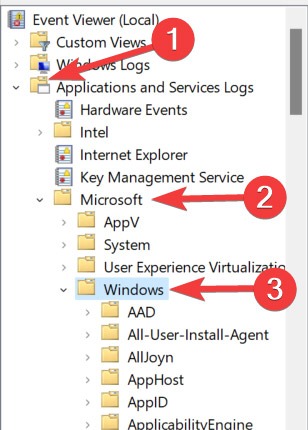
- Scroll to “WMI-Activity,” and click “Operational” in the drop-down.
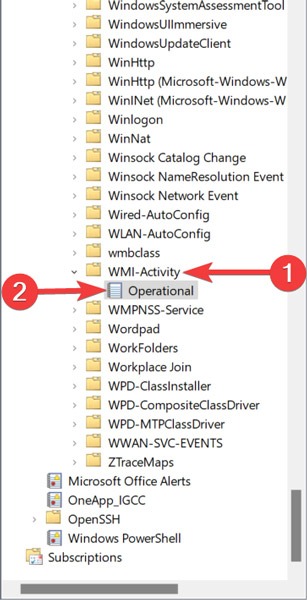
- Find and highlight an “Error” in the logs, and take the “ClientProcessId” from the “General” tab.
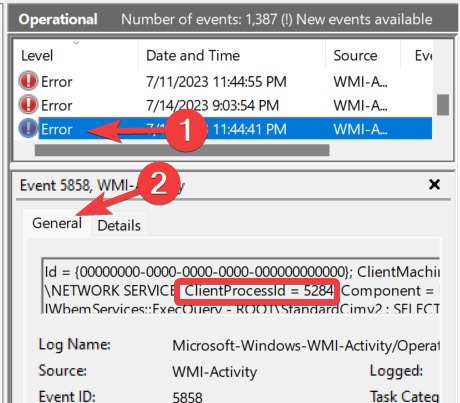
- Return to “Task Manager,” go to the “Details” tab, sort the processes by “PID,” find and right-click the process with the error, and select “Open file location.” That will give you an idea of the software the process is attached to and whether you can reinstall it, uninstall it, update its drivers, etc.
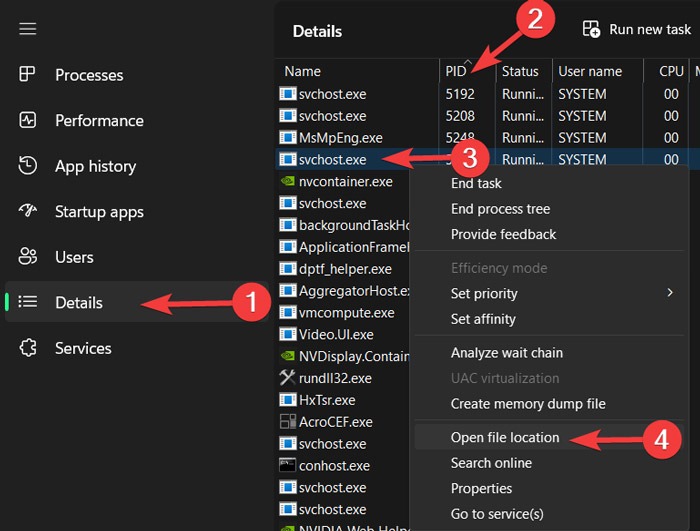
There may be multiple errors like this in the WMI Provider Host, so you should repeat the above process to address the different errors. It’s also possible that just one app/process has been hogging your CPU all this time, so you should be good to go after you’ve dealt with the culprit.
3. Adjust Your Power Plan
Twiddling around in Windows power options can substantially affect your PC performance. If set to “High performance” – mainly if you made tweaks to the “plan settings” – then it’s possible that you’re overloading your CPU. (Again, older devices are susceptible to this.)
Here’s how to reset your power plans:
- Right-click your “Start menu” and open “Settings.”

- Go to the “System” tab and click “Power & battery.”
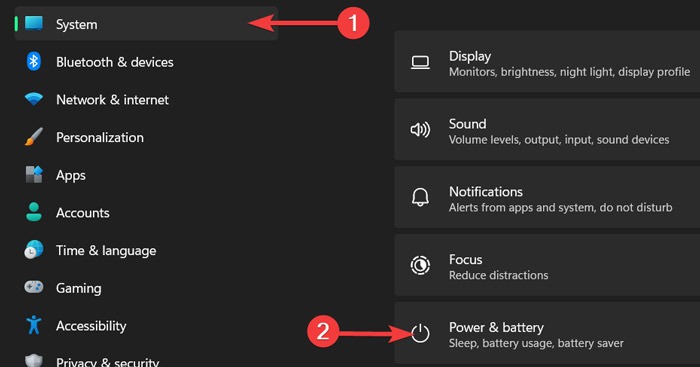
- Change “Power mode” to “Best performance.”

Check Your Power Supply
This one’s an issue that can affect both desktop and laptop Windows users. When you have a faulty power supply, it can automatically start undervolting your CPU to preserve power.
When undervolted, your CPU can function at only a fraction of its total capacity; hence the possibility of this manifesting as 100% CPU usage on Windows.
To solve this on a laptop is quite simple:
- Unplug your device from the power cable.
- Then follow our instructions in the previous section to set its power plan to “Best performance.”
If the issue was with your power supply, the CPU usage should return to normal in the Task Manager.
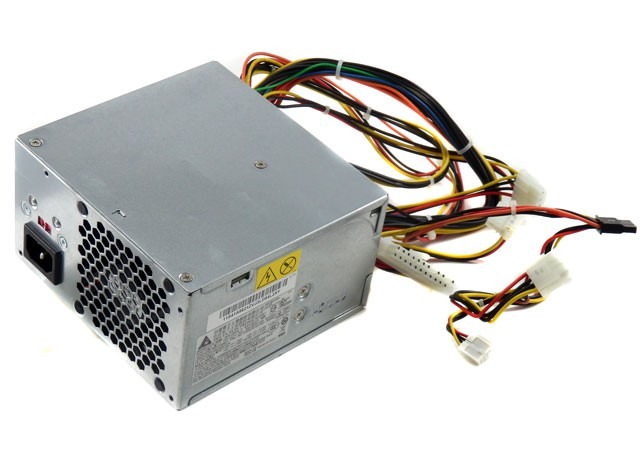
Things can be more complicated on a desktop, as you’ll need to physically remove the PSU from your PC and test a different one. We recommend going through our other tips listed below before trying this.
100% CPU Usage in Games
Most games tend to be GPU-intensive rather than CPU-intensive, so shouldn’t really be hammering your CPU too hard. So if you run a game and shoot up to 100% CPU usage, there might be a problem you have to intervene in as it can cause performance bottlenecks and an ugly “dragging” effect.
Before the game-specific tips below, you should try temporarily turning off real-time protection in Windows Defender when you play, as some people have reported this to cause high CPU usage while gaming.
- Right-click your “Start menu” and open “Settings.”

- Go to the “Privacy & Security” tab and select “Open Windows Security.”
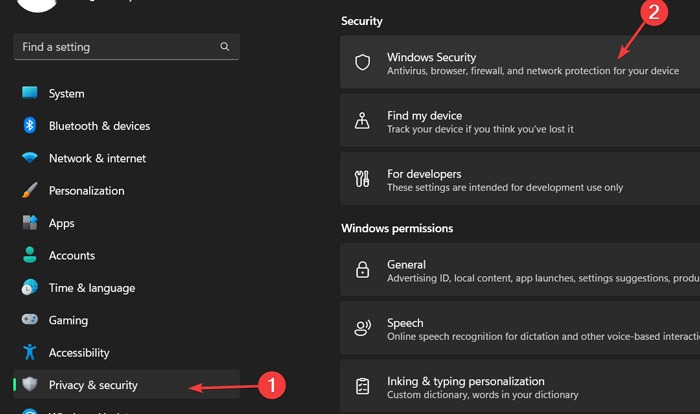
- Click “Virus & threat protection” and open “Manage settings.”
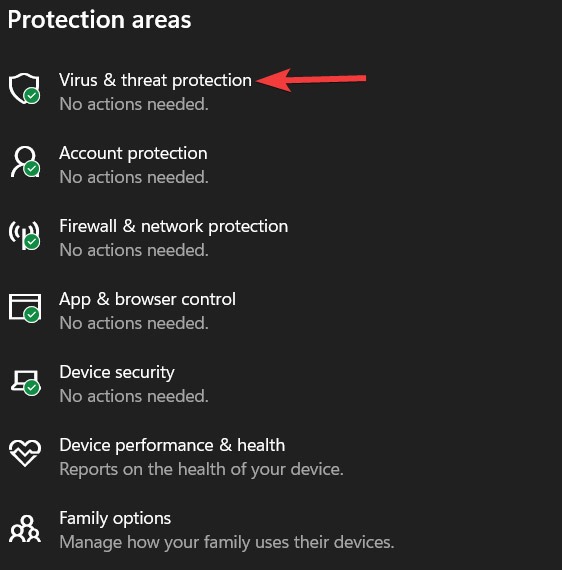
- Switch “Real-time protection” to “Off.”

Here, switch the “Real-time protection” slider to “Off.” We recommend you switch this back on after gaming.
Fix 100% CPU Usage in Warzone
Activision Blizzard’s free-to-play battle royale game – a kind of standalone expansion to Call of Duty: Modern Warfare – isn’t terribly well optimized, and to fix its high CPU usage problem you need to play around in Task Manager.
- Right-click your “Taskbar” and choose “Task Manager.”
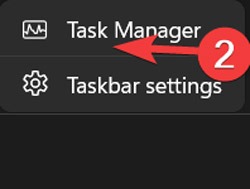
- Click the “Details “tab, then right-click “ModernWarfare.”
- In the context menu, go to “Set priority” then change the game’s priority to “High.”
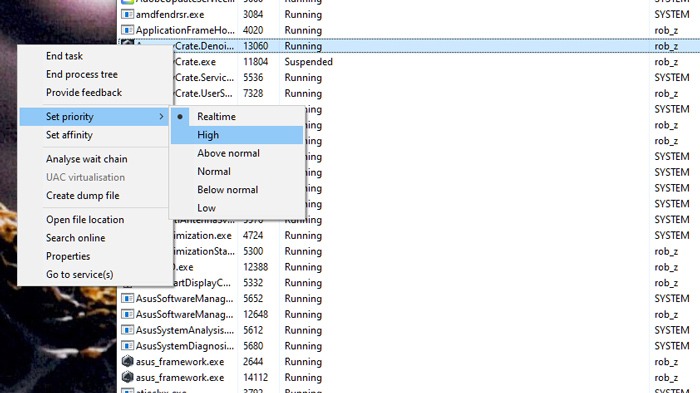
Note: If you’re experiencing high CPU usage in other games, this tip may also solve that problem.
Fix 100% CPU Usage in Apex Legends
High-flying battle royale game Apex Legends should not be rinsing your CPU, but if it is, then the good people of the gaming community have a good workaround for you.
The most popular fix for high CPU usage while playing Apex Legends involves going to the game’s graphics settings and taking a look at your v-sync settings:
- If your v-sync is disabled, switch it to “Dynamic,” apply, then switch back to Disabled.
- Conversely, if your v-sync mode is different, switch to an alternative v-sync mode and switch back again. That should do it.
Disable Third-Party Antivirus Software
This one may be a bit contentious, but our view is that if you’re using antivirus software on Windows, you’re probably putting unnecessary strain on your CPU (mainly if it’s older). The extra security doesn’t usually hurt, but you probably don’t need it.
Every year we write an in-depth feature about Windows’ onboard security software, Windows Defender, and it gets better yearly. At this point, it’s more or less on par with the best antivirus software out there.
Feel free to disable your third-party antivirus software to see if it helps your CPU usage. If it does, uninstall it because Windows Defender should have you covered. It may also run hot with high CPU usage, so we’ve devised many ways to decrease the CPU temperature. Ransomware is also a big culprit in slowing down your PC and heating your CPU, so here’s how to enable ransomware protection in Windows.
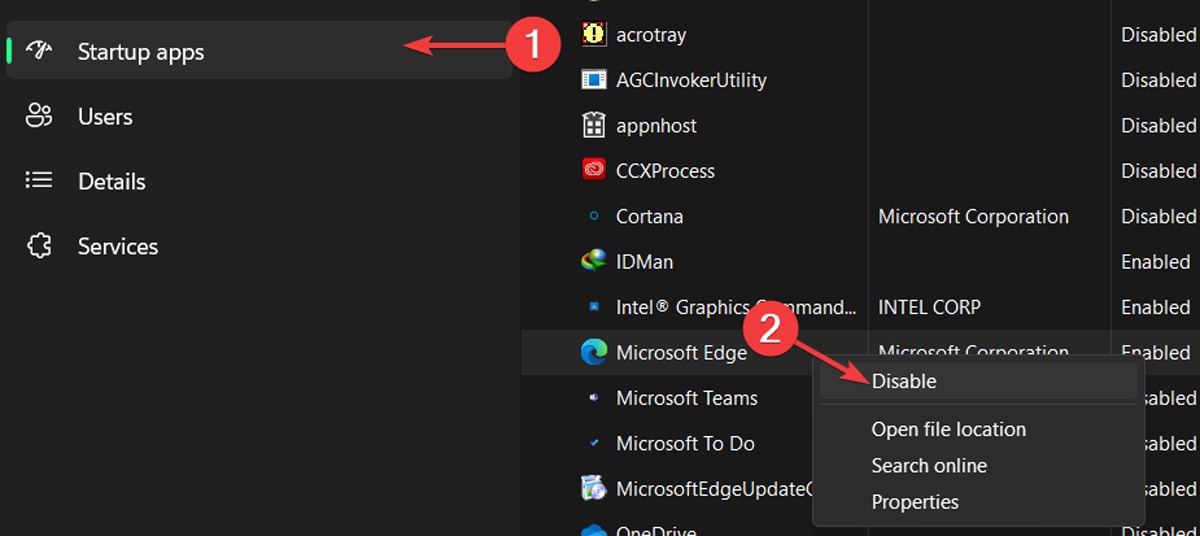
Disable Automatic Startup Applications
Applications that startup automatically when your Windows boots can slow down your system significantly, both in the booting process and during everyday use, as they stay open in the background without your knowledge and use your hardware resources. To rid yourself of this slowdown:
- Right-click your “Taskbar” and choose “Task Manager.”

- Click “More details” to expand the window.
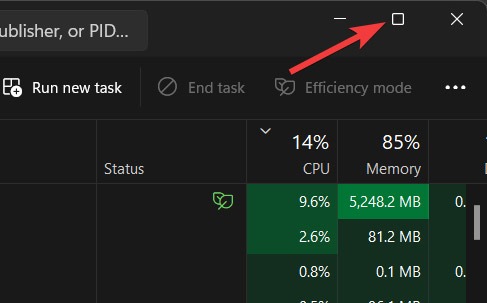
- Go to the “Startup” tab, highlight any app you don’t want to start automatically, then select “Disable.”
Defragment your Hard Drive
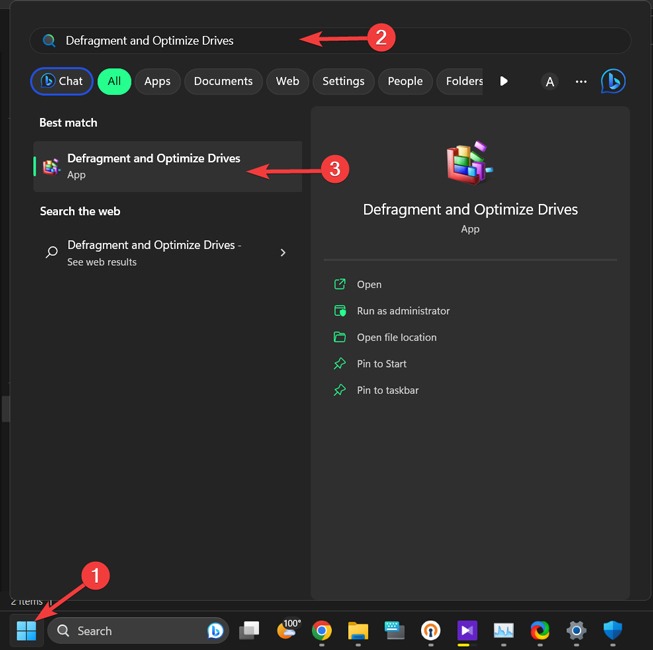
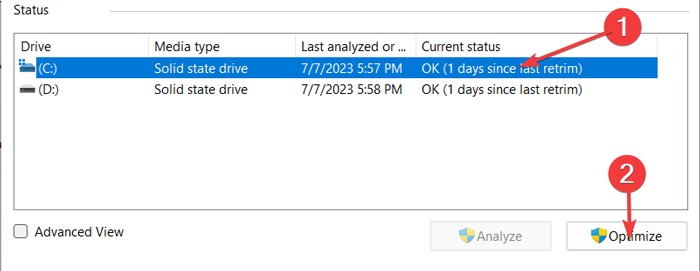
The defragmentation tool in your Windows is one of the most valuable tools to resolve the slowdowns that have occurred. Follow these steps to defragment each drive on your hard disk:
- Click on the “Start menu,” type “Defragment and Optimize Drives,” and press Enter.
- Pick the disk drive you wish to optimize and select “Optimize.”
Disable Cortana
Although Cortana is a valuable voice assistant in Windows computers, it’s always been the primary reason behind several issues with the OS. Accordingly, Microsoft’s lovely voice assistant might be responsible for overloading your CPU; if so, you can fix it using the Windows Registry Editor.
Caution: The Registry Editor is a critical database in Windows computers and could permanently damage your OS if you modify it incorrectly. It’s best to back up the Registry before moving on.
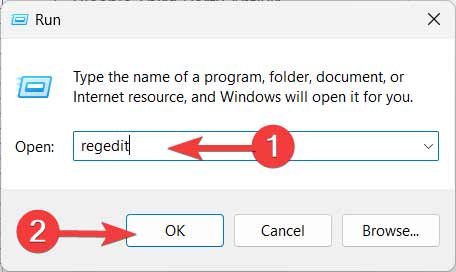
- Right-click your “Start menu” and open “Run.”

- Type “regedit” in the Run window and click “OK.”
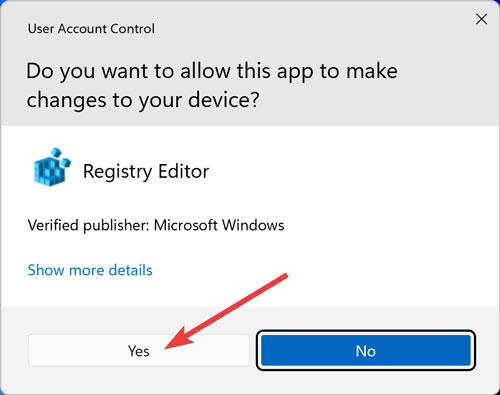
- Confirm the “UAC” prompt by clicking “Yes.”
- Go to the following directory, right-click the “Start” entry, and select “Modify”:
HKEY_LOCAL_MACHINE\SYSTEM\CurrentControlSet\Services\TokenBroker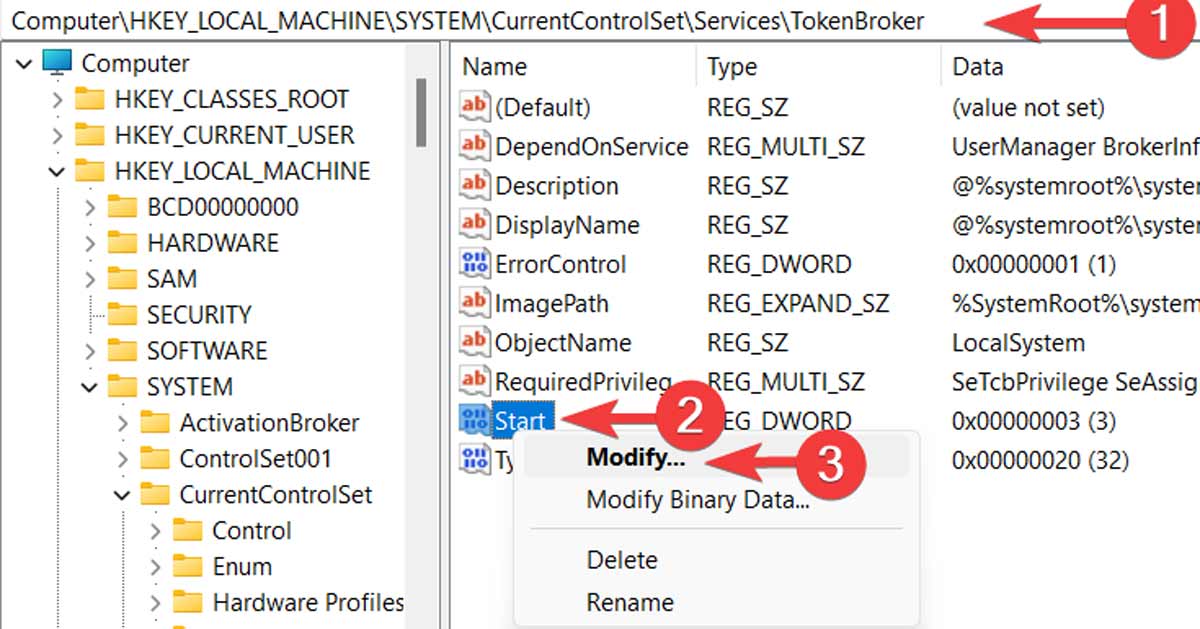
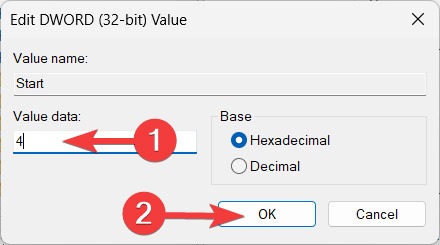
5. Change “Value Data” to 4 and click “OK.”
Turn Windows Notification Settings Off
Windows notification is the next suspect in line for overloading your CPU. While notifications are a primary part of every OS, they could clog the performance by consuming too much CPU capacity. If so, disabling it should do the trick.
- Right-click your “Start menu” and open “Settings.”

- Go to the “System” tab and select “Notifications.”
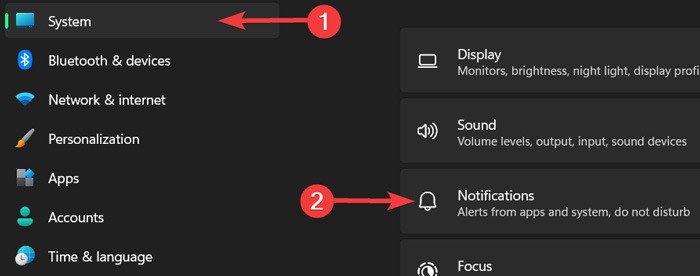
- Turn off the toggle next to “Notifications.”

Frequently Asked Questions
Does the CPU improve FPS?
Yes, Although the FPS you experience in each game depends highly on your GPU, your CPU can also play an important role. Updating your CPU or closing the open tasks in the background that might hold down and demand processing from your CPU can improve your frame rate per second to up to double the amount.
Does RAM affect CPU usage?
Of course. Your RAM assists your CPU in faster processing of the files and tasks, helping it run more processes simultaneously. If you upgrade your RAM to a quicker version or one with more capacity, it will aid your CPU significantly, allowing it to go through different processes more conveniently.
Our latest tutorials delivered straight to your inbox